
USB-C Powered Drip Kits for Balconies (Silent, Safe, Cheap)
Build a quiet, USB-C-powered drip system for balcony plants using a 5V pump or valve, no-solder options, and biology-backed schedules. Safe, cheap, and neighbor-friendly.
SMART GARDENHOME PAGE
8/9/202510 min read
Balcony plants dry out fast—and traditional hose timers are noisy, leaky, or simply not allowed in apartment buildings. This guide shows how to build a silent, USB-C-powered drip irrigation system that runs from a power adapter or power bank. You’ll choose between a no-solder “timer only” build (plug-and-water) and a smart build (ESPHome/Home Assistant) that waters based on soil moisture and weather pauses. We’ll cover parts lists, safe routing on balconies, quiet pump choices, emitter selection that works at low pressure, biology-based watering targets, fail-safes (overflow trays, backflow, leak alerts), and maintenance. Expect to spend US$20–60 depending on how many pots you water.
Why USB-C Drip on a Balcony?
Balcony gardening has constraints you don’t deal with in a yard:
No outdoor faucet: Many apartments forbid resident modifications. USB-C gives you clean 5V power from a wall adapter or even a power bank.
Noise sensitivity: Thin walls + sleeping neighbors. We’ll lean into peristaltic pumps (self-priming, low flow, easy to silence) and 5V submersibles inside a muffled reservoir.
Leak risk upstairs: Systems must be fail-safe, with double containment, overflow capacity, and backflow protection.
Low pressure reality: Typical landscape drip assumes ~1 bar (≈14.5 psi) and pressure-compensating emitters. A 5V system won’t hit that; we’ll use low-pressure friendly emitters and restriction valves instead.
The result: a quiet, compact, permission-friendly setup that waters better than a kitchen-sink jug or a thirsty friend with your spare keys.
Two Build Paths (pick your style)
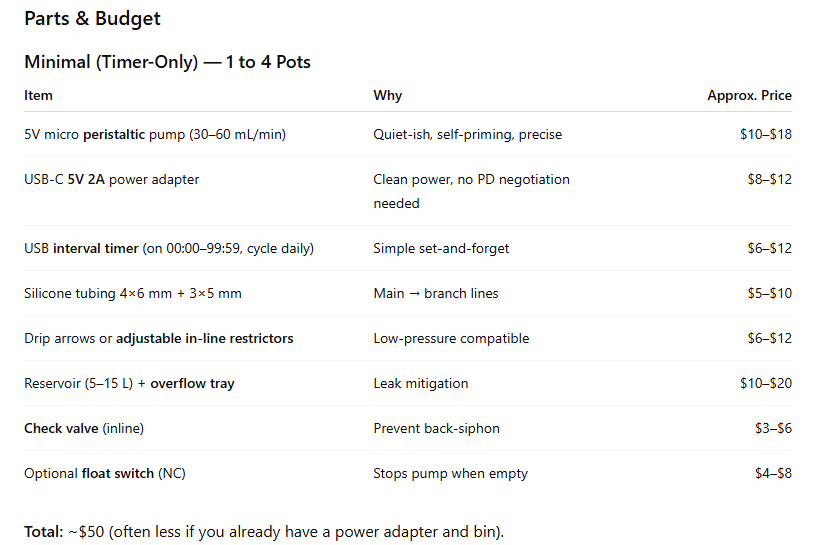
Path A — No-Solder “Timer-Only” Build (cheapest, fastest)
Power: USB-C wall adapter (5V, ≥2A) or power bank that stays on at low load
Pump option 1: 5V micro peristaltic pump (20–100 mL/min, self-priming, can run dry)
Pump option 2: 5V submersible pump (quieter when muffled; higher instantaneous flow; not self-priming)
Control: USB interval timer (on/off cycles) or inline DC timer module
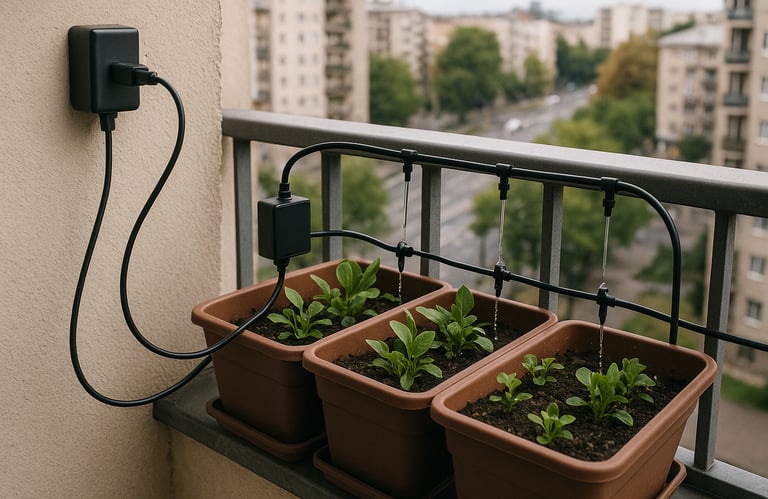
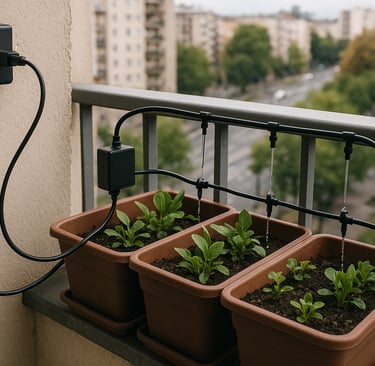
Tubing: 4×6 mm silicone to main line, 3×5 mm or 1/4″ micro-tubing to pots
Emitters: Open-flow drippers / adjustable drip arrows (not pressure-compensating) or inline restrictors
Reservoir: Lidded food-safe box or jerry can, overflow tray under it
Safety: Check valve, optional float switch to cut power if tank runs dry
Best for: 1–6 pots, simple schedules (e.g., 2–5 minutes every morning). No app. No Wi-Fi. Excellent for travel.
Path B — Smart Build (ESPHome + Home Assistant; still no solder if you want)
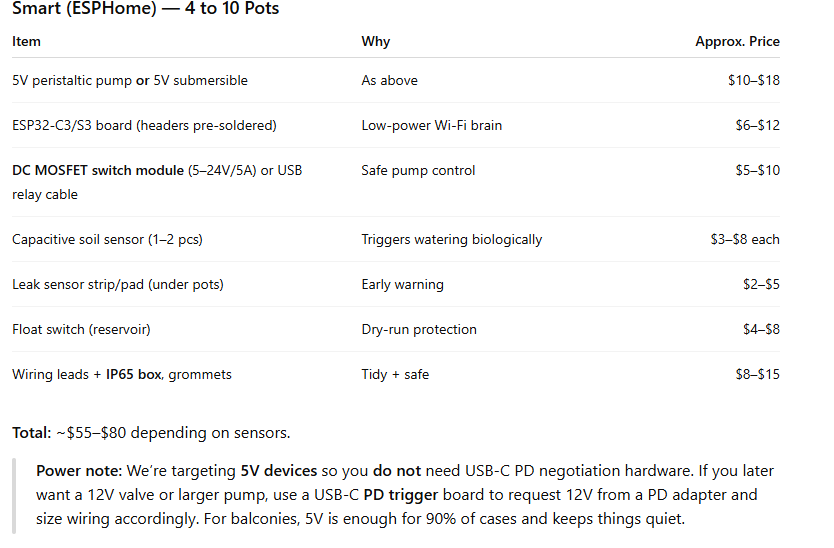
Power: USB-C wall adapter (5V, ≥2A) or PD adapter with trigger (see 12V notes later)
Pump: Same as above; add N-MOSFET switch module (plug-and-play DC switch) or a pre-wired USB “on/off” relay cable
Sensors (optional but recommended): Capacitive soil moisture probe, leak sensor pad, float level switch in reservoir
Brain: ESP32-C3 or ESP32-S3 dev board flashed with ESPHome (Wi-Fi)
Control: Water on sensor thresholds with rain/freeze pause, push alerts, daily max runtime cap
Best for: 2–12 pots, reliable hands-off watering, seasonal adjustment, and logging.
Don’t want to solder? Choose pre-wired pump + pre-wired DC switch (barrel or JST), plus push-fit tees and compression fittings. Everything can be done with scissors and screwdrivers.
Hydraulics 101 for Low-Pressure Balcony Drip
Traditional drip emitters are designed for regulated pressure (e.g., 1 bar). At 5V:
Peristaltic pumps: Low continuous flow (e.g., 50 mL/min) but high head for their size (1–2 m) and self-priming. They can push uphill from a floor reservoir to railing planters.
Submersible 5V pumps: Higher flow (e.g., 200–300 L/h at near-zero head), but pressure collapses quickly as head rises. Use short vertical lifts and larger tubing to reduce friction.
Emitter choices that actually work
Open-flow drippers / adjustable drip arrows (0–40 L/h): The tiny thumbscrew lets you throttle flow at each pot. Works with very low pressure.
Inline needle restrictors: Tiny screw-valves in 1/4″ line give repeatable restriction; use one per pot.
Wicks (cotton or nylon): For micro control in very small pots, but they clog with fertilizer salts; only use indoors or for seedling trays.
Avoid pressure-compensating emitters (PC 2 L/h, 4 L/h). They may not open at your pressure.
Manifolds and balancing
Run a single main (4×6 mm) from the pump up to a T-manifold along the railing.
From the manifold, branch short 1/4″ lines to each pot.
Put restrictors or adjustable arrow drippers on every branch.
Start all branches half-open, run the pump, and balance until each pot gets similar drips.
Reservoir Placement & Balcony Safety
Spill defense: Place the reservoir inside an overflow tray that can hold at least 25–40% of tank volume. If a line pops off, the tray buys time.
Backflow: Install a check valve between reservoir and manifold to prevent siphoning after the pump stops.
Double containment: On high-risk balconies, put the reservoir inside a second bin or use a lid with tube grommets.
Electrical safety: Keep all electrical joints above the water line, use drip loops, and power from a GFCI/RCD-protected outlet.
Weight: A 15 L tank is ~15 kg; confirm your balcony load capacity and keep weight near the wall, not the edge.
Neighbors below: Route lines so that any leak drips back into your own tray, not off the balcony.
Step-by-Step: Timer-Only USB-C Drip (No Solder)
1) Plan your loop (10 minutes)
Count pots and estimate daily need. As a rule of thumb for summer balcony containers:
1–3 L/day for 30–40 cm pots with thirsty herbs/flowers
0.3–1 L/day for smaller 15–20 cm pots
Pick a reservoir size that covers 3–7 days between refills.
Decide pump style:
Peristaltic if you want precision dosing, easy priming, and tolerance of air in lines.
Submersible if you prefer a bit more flow and can keep pump below the pots (short head height).
2) Assemble the wet side (15 minutes)
Push 4×6 mm silicone onto the pump outlet.
Build a small manifold: a length of 4×6 mm tube with multiple barbed tee fittings to branch 1/4″ lines to pots.
At each branch end, install an adjustable drip arrow or inline restrictor.
Insert a check valve directly after the pump (arrow pointing toward the plants).
3) Mount the reservoir (10 minutes)
Drill a snug hole in the lid for the main tube, add a rubber grommet for strain relief.
Place the reservoir bin inside an overflow tray.
Optional: install a float switch through the lid; wire it in series with the pump so that if the tank empties, the switch opens and the pump cuts off (many float switches come with simple crimp connectors—no solder needed).
4) Power & timer (5 minutes)
Plug the pump into a USB interval timer (look for models that let you set “ON for X minutes every 24h,” or cyclic on/off).
Plug the timer into your 5V USB-C power adapter (use a C-to-A cable if the timer is USB-A).
Set an initial test schedule: 2 minutes every morning.
5) Balance emitters (15–30 minutes)
Prime the pump by running it continuously until water reaches all branch ends.
With the pump running, open each restrictor/arrow until you see steady, gentle drips.
Mark each valve position with a paint pen so you can reproduce it after cleaning.
6) Dial the schedule (Biologist’s method)
Water once in the morning. Weigh a test pot before and after watering with a luggage scale or bathroom scale (hold plant + tray).
Track weight 6–8 hours later and the next morning. This rough evapotranspiration loss is your pot’s daily need.
Adjust minutes per day until the morning moisture feels cool and the afternoon droop disappears without leaving soggy media.
7) Silence & tidy
Put the peristaltic pump on thin neoprene or foam to damp vibration.
If using submersible: suspend it inside the reservoir using a silicone loop so it doesn’t buzz against plastic.
Clip lines neatly along the railing; avoid tight bends that can kink.
Step-by-Step: Smart USB-C Drip (ESPHome + Home Assistant)
You can do this without solder using a pre-wired MOSFET DC switch (plugs inline with the pump’s two wires) and Dupont leads to the ESP32. If you prefer, use a USB relay cable that appears as a simple on/off device to the ESP via a transistor switch—either works.
1) Wire it up
Pump → MOSFET switch → 5V adapter. Observe polarity.
ESP32-C3/S3: power via USB.
Control wire: Connect MOSFET signal to a free GPIO (e.g., GPIO3), and MOSFET GND to ESP GND.
Optional sensors:
Soil moisture: capacitive probe AO → ADC-capable pin; VCC → 3.3V; GND → GND.
Float switch: one wire → 3.3V with pull-up; the other → GPIO with internal pull-down.
Leak pad: use a simple resistive leak sensor board → GPIO.
2) Home Assistant automations (logic that protects plants and neighbors)
A. Water on real dryness (containers):
Trigger when Soil Moisture % < 45% (herbs/veg) or < 40% (woody plants) for 15 minutes.
Conditions: reservoir_ok is on (meaning OK), leak is off, and irrigation_paused helper is off.
Action: Turn drip_pump on for 1–4 minutes (peristaltic) or 30–60 seconds (submersible).
Post-action: cooldown for 6–8 hours to allow capillary redistribution.
B. Morning top-off (stability):
At 06:15, run the pump for 30–90 seconds to keep moisture within a narrow band, then let sensor-triggered watering fill gaps later in the day.
C. Rain/freeze pause:
If your balcony is exposed to weather, set irrigation_paused on when forecast rain probability ≥60% in next 6 h, or outdoor temp ≤2°C; clear after conditions improve.
D. Leak alarm:
If leak turns on, cut power to pump immediately, send a phone notification, and set irrigation_paused on.
E. Daily maximum:
Template sensor sums total pump runtime today; if it exceeds 10 minutes, pause and alert. This prevents runaway watering after a line pops.
3) Calibrate soil % properly
Follow the dry/field capacity two-point method (dry sample, then drained-wet sample) and adjust dry/wet voltages in ESPHome to match your media. Container substrates differ wildly; calibration is everything.
Biology-Backed Watering Targets (Containers Only)
In pots, roots live in a shallow, heat-exposed volume. Water drains faster than in beds; perched water layers can form near the bottom depending on media particle size.
Leafy herbs (basil, mint, parsley): Keep 55–65% on your calibrated scale. Herbs become bitter and stall if they swing from soggy to bone-dry.
Fruiting veg (tomato, pepper, chili) in 30–40 cm pots: Target 45–55%. Let moisture dip toward the lower end between deep waterings to encourage deeper rooting, but avoid repetitive wilting.
Citrus/rosemary/woody shrubs: 35–45%. They hate wet feet; add perlite to reduce perched water.
Succulents (balcony sun): Skip drip arrows; give short pulses and longer dry-downs (25–35%), or hand-water when in doubt.
Seasonality: In high summer, increase setpoints by ~5% or add a second short pulse in mid-afternoon. In cool, overcast spells, drop setpoints by 5% and reduce max daily runtime.
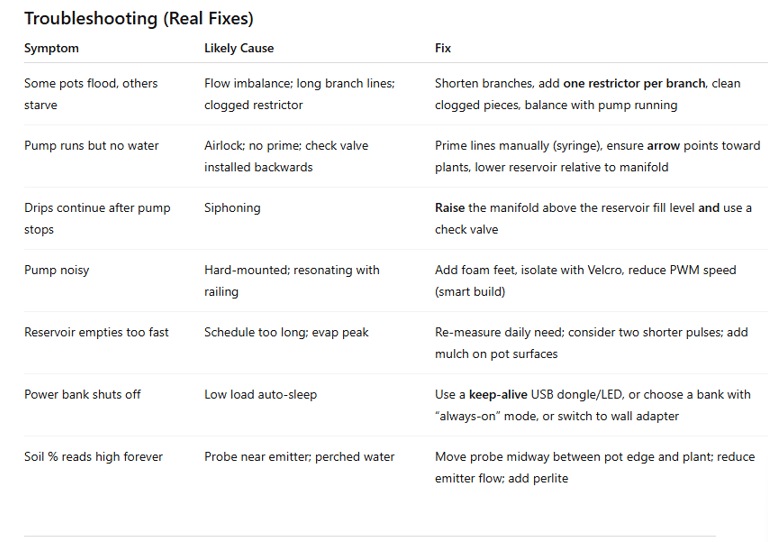
Noise-Reduction Tricks (Apartment-proof)
Peristaltic enclosure: Place the pump in a small felt-lined plastic box with a slit for tubing. Add four silicone feet.
Decouple: Avoid hard mounting to balcony metal; use Velcro or double-sided foam tape.
Submersible staging: Hang the pump mid-water using a silicone band from the lid so it never touches the bin walls.
Scheduling: Run only daylight hours (06:00–19:00) unless heat demands an evening top-off.
Vacation-Reliability Checklist
Two levels of protection: Overflow tray + double-walled reservoir or bin-inside-bin.
Max runtime cap: Hardware (timer limit) and software (HA daily total).
Leak sentinel: Cheap sensor pad under the lowest pot (leaks flow downward).
Spare tubing and tees: Stash in the reservoir lid.
Test for 72 hours before leaving: Top off the reservoir and don’t touch anything—watch logs and soil % drift.
Maintenance (10 minutes/month)
Flush lines: Run the pump with clean water for 2–3 minutes every two weeks, especially after fertilizing.
Clean restrictors: Soak in warm water + drop of dish soap monthly; rinse.
Sanitize reservoir: Rinse and sun-dry every 1–2 months to suppress biofilm.
Inspect for salt creep: White crust near emitters? Soak and scrub lightly.
Recalibrate seasonally: Media properties change over time; redo your dry/wet points spring and fall.
Frequently Asked Questions
Do I need pressure-compensating emitters?
No. At 5V you’ll usually be under the opening pressure of PC emitters. Use adjustable drip arrows or inline restrictors designed for micro-flow.
Peristaltic or submersible—what’s better for balconies?
For quiet precision and self-priming, choose peristaltic. For higher but bursty flow in short lifts (reservoir on floor, plants on same level), submersible is fine and cheaper. Peristaltics also tolerate running dry briefly.
Can I run from a power bank during outages?
Yes, but make sure the bank supports low-draw always-on. Many banks shut off when current falls below ~50–80 mA. A small “keep-alive” USB dongle fixes that.
How many pots can one 5V pump handle?
A single peristaltic (50 mL/min) can comfortably serve 4–8 pots if you water in longer pulses and balance restrictors. A small submersible can split to 8–12 pots if the head height is low and branches are short.
Is fertilizer safe through the pump?
Dilute fertilizer is fine, but flush monthly. Peristaltic tubing is a consumable—replace when it stiffens.
Will this work in winter?
If your balcony freezes, bring the pump/reservoir indoors or fully drain lines after each run. Add a temperature condition to pause when below 2°C.
What about 220V/127V outlets?
USB-C adapters are universal; ensure they accept your mains voltage. Always plug into a GFCI/RCD protected outlet on balconies.
Example Schedules (to copy)
Herbs & flowers (6 × 30–40 cm pots; peristaltic 50 mL/min)
Morning: 2 minutes (≈100 mL per pot after balancing)
Sensor top-ups: Trigger at <55% (15-minute debounce), limit to 2 minutes per event, max 8 min/day total
Tomatoes/peppers (3 × 40 cm pots; submersible)
Morning: 45 seconds (≈150–250 mL/pot depending on restriction)
Afternoon: 30 seconds if vapor pressure deficit (VPD) high (hot, dry day)
Sensor guard: Trigger at <45%, max 5 min/day
Small pots/rail planters (10–15 cm)
Every other day: 30–60 seconds, or wick system with once-daily 30 seconds—avoid constant wetness
Advanced: Using USB-C PD at 12V (Optional)
If you truly need a 12V valve (quicker shutoff, less risk of gravity drips), you can keep the same design and swap in:
USB-C PD trigger set to 12V
12V normally-closed solenoid valve rated for potable water
12V DC-DC buck (optional) to step back down to 5V for sensors/ESP
This raises complexity and noise (solenoids click), but grants sharper control. For most balconies, 5V is simpler and quieter.
Environmental Wins (and Why Your Plants Will Look Better)
Water on physiology: Even in the timer-only build, short morning pulses line up with stomatal opening and daily transpiration.
Less salt burn: Controlled drip avoids “feast/famine” cycles that leave fertilizer salts on the rim.
Fewer fungus gnats: Surface isn’t constantly wet; moisture pulses drop biofilm.
Real savings: Water only where roots live, not the tiles.
With USB-C power, a quiet peristaltic or submersible pump, and low-pressure friendly emitters, you can run a balcony irrigation system that’s near-silent, leak-aware, and tuned to plant physiology—without tapping a building water line or waking the neighbors. Start with the timer-only version if you’re in a rush. When you’re ready, drop in an ESP32 and let soil moisture and safety limits call the shots.
Inspirations for a Sustainable living
Explore home and garden ideas, tutorials, and tips.
ConTACT
br1heusi@gmail.com
© 2025. All rights reserved.