
How to Install a Solar-Powered Smart Irrigation System in One Afternoon
Installing irrigation systems can be tricky for begginers, that is why we decided to create this post, to help you understand how to properly install it in one afternoon
SMART GARDENSMART HOMEGROW YOUR OWN FOODDIYHOME PAGE
8/11/20253 min read
Imagine Never Worrying About Watering Your Plants Again
Picture this: it’s the middle of summer, you’re away for the weekend, and instead of rushing home worried about your plants, you get a notification on your phone — “Garden irrigation completed, soil moisture optimal.” That’s the power of a solar-powered smart irrigation system.
In this guide, we’ll walk you through:
Why solar irrigation is a game changer for sustainable gardening
How it works and what makes it “smart”
Step-by-step installation (beginner-friendly)
Pro tips for maximum efficiency
Common mistakes to avoid
Recommended beginner-friendly systems
By the end, you’ll be ready to have your garden water itself automatically — using nothing but the sun’s energy.
Why Go Solar for Your Smart Irrigation?
Smart irrigation systems already improve plant care by using real-time data (from soil moisture sensors or weather forecasts) to control watering. Pairing that intelligence with solar power creates the ultimate eco-friendly solution.
Top Benefits:
Energy independence – No need to plug into the grid
Eco-friendly operation – 100% renewable power
Lower costs – No electricity bill from running your watering system
Perfect for remote areas – Works even in gardens far from electrical outlets
Low maintenance – Fewer moving parts than electric pumps
💡 Pro Tip: Solar irrigation works best in areas with 4–6+ hours of direct sunlight daily. If your garden gets less, consider adding a backup rechargeable battery.
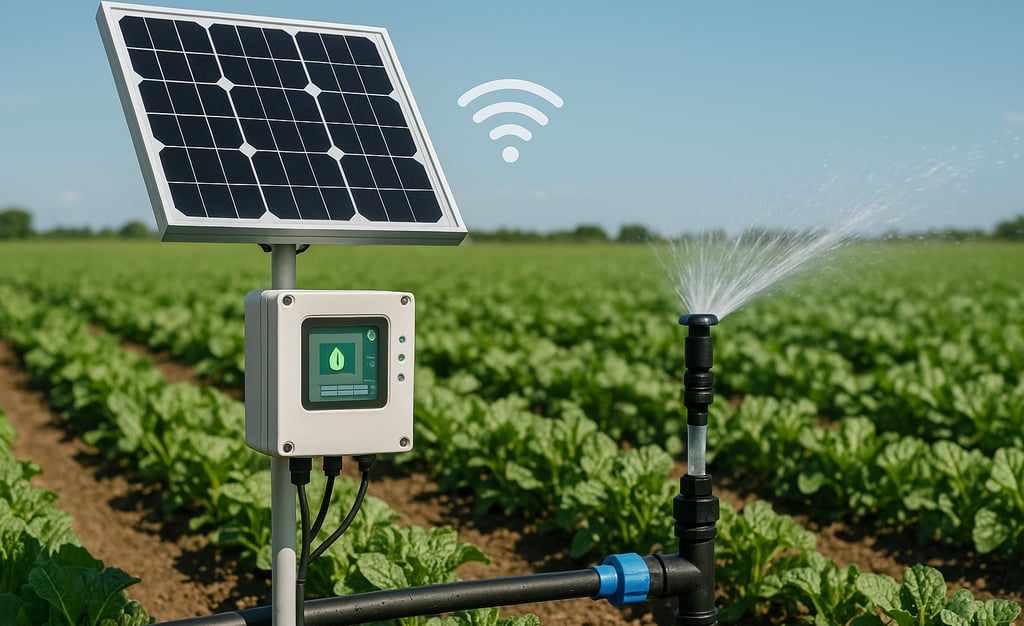
How a Solar-Powered Smart Irrigation System Works
A solar-powered smart irrigation setup combines:
Solar Panel – Captures sunlight to power the system and charge a built-in battery.
Controller Unit – The “brain” that decides when to water based on sensor data or a set schedule.
Soil Moisture Sensor – Reads soil moisture and sends data to the controller.
Irrigation Tubing/Drippers – Delivers water directly to the plants.
When the soil moisture drops below your set level, the controller activates the pump or valve to start watering. Once moisture returns to the optimal range, the system shuts off automatically.
What You’ll Need to Get Started
Before you install, gather the following items:
Solar-powered smart irrigation controller (with or without built-in soil sensor)
Drip irrigation tubing or soaker hose
Garden stakes to hold tubing in place
Water source connection kit (faucet adapter or water tank outlet)
Optional: Extra soil moisture sensors for multiple zones
Basic tools – scissors, pliers, and a small spade
Step-by-Step Installation Guide
Step 1: Position Your Solar Panel
Choose a sunny location with no shade during peak daylight.
Mount it securely on a wall, pole, or fence.
Make sure it faces south (in the Northern Hemisphere) for maximum sun exposure.
Step 2: Install the Controller
Mount the controller near your water source.
Connect it to the solar panel using the provided cable.
Let it charge for a few hours before use.
Step 3: Lay the Irrigation Tubing
Run drip lines through your beds, keeping them close to plant bases.
Secure them with garden stakes to prevent shifting.
Cut and connect lines using T-connectors or elbows for corners.
Step 4: Attach the Water Source
Connect the system to a garden faucet or water tank.
If your water pressure is high, install a pressure regulator to protect tubing.
Step 5: Add the Smart Features
Insert the soil moisture sensor in a representative spot in the garden (not too close to edges or heavily shaded areas).
Pair it with the controller using the instructions in the manual or app.
Step 6: Program the System
Use the app or built-in screen to set moisture thresholds or timed schedules.
Many models allow weather integration — enabling watering adjustments based on rain forecasts.
Step 7: Test the Setup
Run a test cycle to check for leaks, clogs, or uneven water distribution.
Adjust tubing placement if necessary.
Pro Tips for Maximum Efficiency
Water Early in the Morning – Reduces evaporation and fungal risk.
Combine with Mulching – Retains moisture and reduces how often the system runs.
Clean the Solar Panel – Dust and debris can cut efficiency by up to 20%.
Seasonal Adjustments – Reduce watering in cooler months to avoid root rot.
Common Mistakes to Avoid
Placing the solar panel in partial shade – Your battery will run out faster.
Overcomplicating your first setup – Start with one irrigation zone before expanding.
Ignoring sensor placement – One badly placed sensor can lead to over- or under-watering.
Skipping maintenance checks – Drip emitters can clog over time.
Recommended Solar-Powered Smart Irrigation Systems for Beginners
1. RAINPOINT Solar Irrigation Kit
Price: ~$65
Best For: Small gardens & balconies
Key Features: App control, timer, soil sensor input
Pros: Easy setup, portable
Cons: Not ideal for large yards
2. LinkTap G2-S + Solar Add-on
Price: ~$160
Best For: Medium to large gardens
Key Features: Weather-based watering, Wi-Fi control
Pros: Very accurate, integrates with weather forecasts
Cons: Higher price
3. Blumat Solar Drip Kit
Price: ~$50
Best For: Low-tech users
Key Features: Self-regulating moisture control, no electricity needed
Pros: Simple, reliable
Cons: No app or remote control
Final Thoughts
A solar-powered smart irrigation system is one of the best investments you can make for a healthy, low-maintenance garden. It combines automation, efficiency, and sustainability, making it ideal for gardeners who want results without constant manual work.
If you’re just starting, a beginner-friendly kit like RAINPOINT offers a quick, low-cost entry point. Once you’re comfortable, you can upgrade to a more advanced Wi-Fi-enabled system like LinkTap for weather-based automation.
Inspirations for a Sustainable living
Explore home and garden ideas, tutorials, and tips.
ConTACT
br1heusi@gmail.com
© 2025. All rights reserved.