
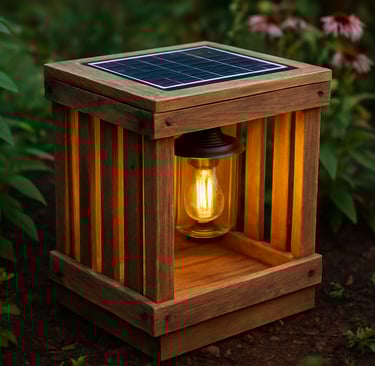
Transforming a Wooden Crate into a Solar-Powered Garden Light Box
DIY
8/8/20258 min read

Introduction to Upcycling and Solar Power
Upcycling is a creative practice that transforms old or unused materials into new products of higher quality or value. It embodies sustainability by reducing waste and promoting innovative thinking. The benefits of upcycling extend beyond environmental conservation; they also foster creativity and resourcefulness. By repurposing items like wooden crates, individuals can contribute to a more circular economy while cultivating a unique aesthetic in their homes or gardens. This practice not only prevents items from ending up in landfills but also encourages a more mindful approach to consumption and creativity.
In the context of outdoor spaces, lighting plays a crucial role in setting the atmosphere and enhancing safety. Solar power emerges as an efficient and environmentally-friendly solution for garden lighting. This renewable energy source harnesses sunlight through photovoltaic panels, converting it into electricity. One of the primary advantages of solar-powered lights is their independence from the electrical grid, which reduces energy costs and minimizes environmental impact. Additionally, the ease of installation and variety of designs available makes solar garden lights increasingly popular among homeowners seeking sustainable options.
By transforming a wooden crate into a solar-powered garden light box, individuals can create functional and artistic pieces that illuminate their outdoor areas. This project not only promotes upcycling and creativity but also supports eco-friendly practices by utilizing solar energy. Incorporating such innovative solutions into garden design not only enhances the appearance of outdoor spaces but also encourages a sustainable lifestyle. The fusion of upcycling and solar power exemplifies how everyday materials can be transformed into valuable, energy-efficient products that benefit both the environment and personal wellbeing.
Materials Required
When embarking on the project of transforming a wooden crate into a solar-powered garden light box, gathering the right materials is essential for both functionality and aesthetic appeal. Below is a comprehensive list of materials and tools you will need to successfully complete this transformation.
The primary component of this project is, of course, the wooden crate. It is advisable to choose a sturdy crate that can withstand outdoor conditions. Many local hardware stores, garden centers, or online marketplaces offer a variety of wooden crates. Look for those that are made of untreated wood to ensure they are safe for garden use.
The second key component is the solar light kit. These kits generally come equipped with solar panels and LED lights. Selecting an affordable and efficient solar light kit is crucial, as it will determine the brightness and longevity of your garden light box. Retailers such as home improvement stores and online platforms like Amazon often provide a variety of options to suit your budget and preferences.
Additional materials include sandpaper for smoothing out rough surfaces, which is essential for preventing splinters. If desired, paint can be added to enhance the visual aspect of your wooden crate. You may also consider applying a weatherproof sealant to prolong the life of the wood, particularly if you live in an area with harsh weather conditions.
For the assembly process, you will need a drill and screws to secure the solar components and any decorative elements. Decorative items could include fabric, ribbons, or additional lighting features that complement the solar lights. These extras can be sourced from craft stores or online retailers. Collecting the right materials will ensure a successful and aesthetically pleasing transformation of your wooden crate into a functional solar-powered garden light box.
Preparing the Wooden Crate
Transforming a wooden crate into a solar-powered garden light box begins with careful preparation of the crate itself. Proper cleaning is fundamental in this process, as it ensures that any dust, dirt, or debris is removed, allowing for a smooth surface for subsequent treatments. Use a damp cloth to wipe down all surfaces of the crate thoroughly. For particularly stubborn spots, a mild soap solution may be utilized; however, make sure to let the crate dry completely to prevent moisture issues later.
Once the crate is clean, the next step involves sanding. This step is crucial for removing any rough edges or splinters that may pose safety risks. A sanding block or an electric sander can be employed to achieve a uniform texture. Aim for a smooth finish, as this not only enhances safety but also improves paint adhesion, should you choose to paint or stain the crate. Sanding will create an ideal surface to apply the desired treatment—be it paint or stain, both of which can further contribute to the aesthetic appeal of your solar-powered garden light box.
When selecting a paint or stain, consider using weather-resistant options to ensure durability under outdoor conditions. Weatherproofing the crate is critical, as exposure to rain, sun, and varying temperatures can deteriorate untreated wood over time. Look for products labeled as exterior-grade; these are specifically designed to withstand outdoor elements. If you prefer a natural wood appearance, select a high-quality outdoor wood stain that complements your garden's existing color palette. You may also opt for a vibrant paint hue to add a splash of color to your garden space.
Additionally, enhancing the aesthetics of the crate can involve integrating decorative elements such as stencils, stickers, or etchings. These customizations can make your light box unique and personalized, elevating its visual impact in your garden area. Once these preparation steps are completed, your wooden crate will be ready for the installation of solar components, transforming it into a functional and attractive garden feature.
Installing the Solar Light Kit
To successfully install the solar light kit into the prepared wooden crate, begin by reviewing the components of your kit. A typical solar light setup includes a solar panel, rechargeable battery, LED light fixture, and the necessary wiring. Begin by selecting an optimal location on the crate to secure the solar panel, ensuring it has maximum exposure to sunlight throughout the day. Choose a position on the top of the crate or an area that faces direct sunlight, free from the obstruction of branches or nearby structures.
Next, affix the solar panel using the mounting brackets or screws provided in the kit. Ensure that it is firmly secured to withstand wind and precipitation. Once the solar panel is installed, connect the wiring from the panel to the battery, following the instructions provided by the manufacturer. Properly connecting these components is crucial for efficiency; check that positive and negative connections are aligned correctly to prevent any malfunction.
With the wiring in place, it is time to install the light fixture inside the crate. This should be positioned strategically to provide effective illumination wherever needed. One recommended approach is to mount it towards the upper part of the interior to maximize light distribution. Make sure that the fixture is also securely fastened, as this will help maintain functionality while preventing any movement that could disrupt the setup.
After all components are in place, take a moment to evaluate the connections and configurations for any potential issues. It is essential to conduct a test run during the initial night to observe the performance of the solar-powered light box. If the light doesn’t illuminate, double-check the wiring connections and ensure the solar panel receives adequate sunlight. Troubleshooting common issues, such as poor battery performance or faulty wiring, will enhance the overall efficiency of your solar garden light box.
Sealing and Final Assembly
Sealing the wooden crate is a critical step in ensuring that your solar-powered garden light box withstands exposure to the elements. Proper sealing protects the wood from moisture, decay, and other environmental factors that could compromise its longevity. Start by selecting a high-quality weatherproof sealant that is specifically formulated for outdoor use. Apply the sealant generously around the solar panel fittings, as these areas are susceptible to water ingress, especially during rain or snow. Be mindful to cover any seams or joints effectively, as these can be potential entry points for water.
When applying the sealant, ensure you follow the manufacturer’s instructions regarding curing time and application thickness. It is advisable to use a brush or caulking gun to achieve an even layer for maximum effectiveness. This will not only extend the life of your wooden crate but also maintain the aesthetic integrity of your solar-powered light box.
Once the sealing process is complete, you can proceed with the final assembly of your garden light box. Begin by securing all internal components, including the solar panel, battery, and light fixture, ensuring they are tightly fastened to avoid any movement that may occur with outdoor use. It is crucial to check that all electrical connections are secure and properly insulated to prevent short circuits. Additionally, ensure that the light source is positioned adequately to disperse light effectively across the intended area.
After securely assembling all parts of the light box, take a moment to examine its overall visual appeal. A well-constructed and sealed solar-powered garden light box not only serves its functional purpose but also adds an aesthetically pleasing element to your garden space. Lastly, allow the sealant to fully cure before placing the light box outdoors, as this will optimize its resistance to environmental conditions.
Placement and Benefits in the Garden
When transforming a wooden crate into a solar-powered garden light box, strategic placement is essential for maximizing functionality and aesthetic appeal. The primary consideration should be ensuring that the solar light box receives ample sunlight during the day. Ideal locations typically include spots that are unshaded for the majority of daylight hours, such as near pathways, garden beds, or seating areas. Elevated positions, such as on a raised platform or mounted on a post, can enhance sunlight exposure and improve visibility at night.
Another factor to consider is the distance between the solar lights and areas of interest within the garden. For example, positioning the light box along a garden path not only illuminates the walkway for safety but also creates a welcoming ambiance. Additionally, placing them near flower beds or ornamental plants enhances the overall aesthetic while showcasing the beauty of the garden in the evening hours.
The benefits of incorporating solar-powered lights in garden settings are substantial. Firstly, these lights contribute to energy savings as they rely on sunlight for power, which translates to lower electricity bills and reduced reliance on traditional energy sources. This also contributes to a smaller carbon footprint, aligning with environmentally friendly practices and sustainable living ideals. As solar lights utilize renewable energy, they lead to less environmental degradation compared to conventional lighting methods that often rely on non-renewable energy sources.
Furthermore, solar gardens lights improve nighttime visibility, promoting safety for those navigating the garden after sundown. By highlighting garden features, they create a serene and enchanting atmosphere, allowing for extended enjoyment of outdoor spaces. The thoughtful placement of a solar-powered light box not only enhances aesthetic appeal but also aligns with energy-efficient practices, making it a worthwhile addition to any garden.
Maintenance and Care
To ensure the longevity and optimal performance of your solar-powered garden light box, regular maintenance is essential. A few simple care routines can considerably enhance the lifespan and efficiency of your project.
First and foremost, it's important to keep the solar panel clean. Dust, dirt, and debris can accumulate on the surface of the panel, preventing it from effectively absorbing sunlight. To clean the solar panel, use a soft, damp cloth and gently wipe away any contaminants. This should be done every few weeks, particularly in dusty environments or after heavy rainfall.
Next, regularly check the battery. Solar-powered systems rely heavily on efficient battery function to store energy for nighttime use. Inspect the battery at least once every few months for any signs of corrosion or wear. Replacing the battery periodically—generally every 1 to 3 years depending on usage—will ensure that your light box remains functional.
Moreover, assess the lighting components, such as the LED bulbs, to confirm they are operating effectively. Replace any burnt-out bulbs promptly to maintain desired brightness levels. Regular inspection not only keeps your garden illuminated but also helps identify any potential issues early.
Seasonal care is also vital. In winter, harsh weather conditions can be detrimental to your solar-powered garden light box. It is advisable to bring the crate indoors if severe snow or ice is expected. If relocating is not feasible, consider adding protective covers to shield the light box from extreme elements while ensuring that it remains accessible for sunlight absorption in milder conditions.
Implementing these maintenance tips is crucial to prolonging the life of your solar-powered garden light box and ensuring it continues to bring light and beauty to your outdoor space.
Inspirations for a Sustainable living
Explore home and garden ideas, tutorials, and tips.
ConTACT
br1heusi@gmail.com
© 2025. All rights reserved.