DIY Guide: How to Build a Stackable Herb Drying Rack
DIY
8/8/20258 min read
Introduction to Herb Drying
Herb drying is a crucial step in preserving the quality and efficacy of culinary and medicinal herbs. By removing moisture content from fresh herbs, the drying process prevents spoilage, thus prolonging shelf life while retaining distinctive flavors, aromas, and essential oils. Fresh herbs are rich in volatile compounds that contribute to their taste and aroma, but when not dried properly, these characteristics may diminish over time.
There are several methods for drying herbs, including air drying, oven drying, dehydrating, and using microwave techniques. Air drying is a traditional approach that involves hanging herbs in a well-ventilated area away from direct sunlight, allowing natural air circulation to extract moisture. Oven drying offers a quicker solution but requires careful temperature regulation to avoid cooking the herbs. Dehydrators provide a controlled environment that effectively removes moisture while preserving the herb’s integrity. Microwave drying, though rapid, is not commonly recommended, as it may alter the flavor profile significantly if not monitored closely.
One effective solution for optimizing the herb drying process is the use of a stackable herb drying rack. This innovative design maximizes vertical space and allows for large quantities of herbs to be dried simultaneously without compromising air circulation. The stackable nature of these racks enables users to simply add additional layers as needed, which is essential for those working with multiple varieties of herbs or large harvests. Furthermore, using such a rack enhances the efficiency of the drying process, allowing more herbs to be dried in a shorter amount of time.
Incorporating a stackable herb drying rack into your herb drying routine not only accelerates the process but also promotes organization, making it simpler to manage various herbs effectively. By understanding the importance of herb drying and the tools available, you can elevate your culinary or medicinal herb endeavors.
Gathering Materials for Your Drying Rack
Constructing a stackable herb drying rack requires careful selection of materials to ensure functionality and safety. The first step in this process involves choosing the appropriate wood. It is advisable to select untreated hardwoods such as maple, oak, or birch. These types of wood are not only durable but also free from the harmful chemicals often found in treated wood. This is particularly important when preparing a drying rack that will come into contact with food items.
Next, obtaining mesh fabric is crucial for promoting airflow around the herbs during the drying process. Look for food-safe, breathable mesh materials such as nylon or polyester, which allow for proper ventilation while shielding the herbs from dust and insects. Avoid plastic netting, as it may trap moisture and foster mold growth, compromising the quality of your herbs.
In addition to wood and mesh, you will need several essential tools to assemble your drying rack effectively. A saw will be required to cut the wood to the desired dimensions, while a drill can be used for making precise holes for attaching the mesh. A measuring tape ensures that all dimensions are accurate, thus enhancing the overall stability and functionality of the drying rack. Furthermore, clamps can be helpful for holding components in place during assembly.
Additionally, non-toxic adhesive or screws may be considered for joining pieces of wood securely. Take care to verify that any products used are labeled as safe for food contact. By gathering these appropriate materials and tools, you will lay a solid foundation for creating a functional, safe, and stackable herb drying rack, enhancing your ability to preserve herbs efficiently.
Step-by-Step Instructions for Assembly
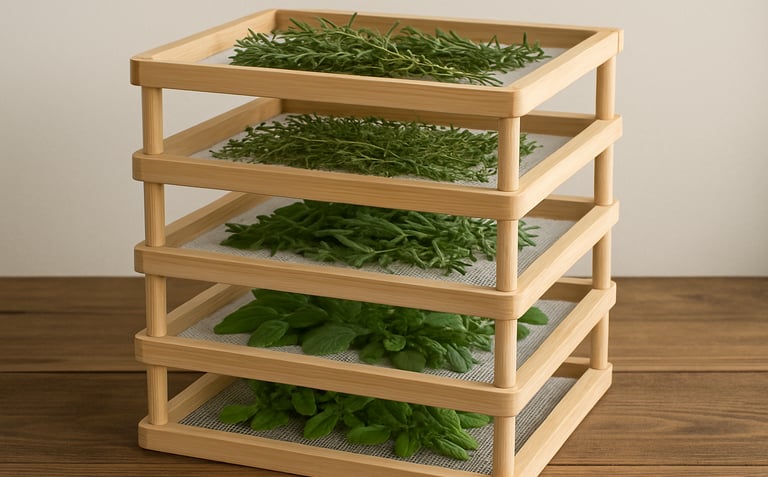
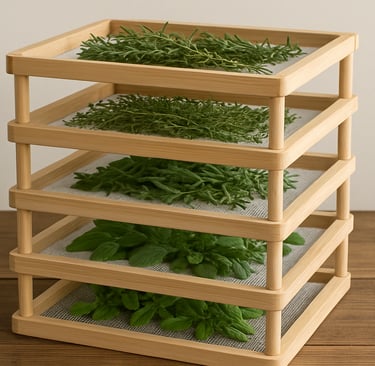
Building a stackable herb drying rack is an engaging and productive project that can enhance your herb preservation process. The assembly begins with cutting the wood pieces. For a standard six-tier rack, you will need 12 vertical supports, typically made from 1x1 inch lumber, and 6 horizontal frames made from 1x2 inch lumber. Use a miter saw or hand saw to carefully cut your wood to the desired lengths, ensuring precision for a stable structure.
Next, proceed to construct the frames. Begin by taking two pieces of 1x2 inch wood to create a rectangular frame for each tier. Secure the corners using wood screws or corner brackets for added strength. Repeat this step until you have created frames for all six tiers. To enhance the durability and functionality of your drying rack, consider sanding the edges of the frames, which will prevent any splinters when handling the racks.
After constructing the frames, the next step is to attach the mesh. Utilizing nylon or fiberglass mesh is recommended, as it is lightweight and allows airflow—crucial for drying herbs effectively. Cut the mesh to slightly exceed the dimensions of the frames. Using a staple gun, attach the mesh securely to each frame, ensuring there are no gaps where herbs could fall through.
Once all the mesh has been attached, it's time to ensure the stability of your stackable herb drying rack. Assemble the vertical supports by attaching them to the corners of the frames using wood screws. If you wish to further enhance stability, consider adding cross braces between the vertical supports. This will prevent any wobbling when the rack is fully loaded with herbs. By following these detailed steps, you will have a robust and functional herb drying rack ready for use.
Adding Features for Enhanced Functionality
When constructing a stackable herb drying rack, integrating additional features can significantly improve its usability and effectiveness. One paramount improvement is the incorporation of removable trays. These trays enable users to effortlessly collect dried herbs without disturbing the entire structure, promoting ease of use while ensuring that sensitive herbs remain intact. Removable trays can also be designed with mesh bottoms to enhance airflow, further facilitating the drying process. Increased airflow is essential in preventing mold and ensuring that the herbs retain their quality throughout the drying phase.
Another feature to consider is adjustable height options. By allowing for different stacking heights, users can customize the drying rack to accommodate varying quantities and types of herbs. For instance, when drying larger batches, a higher configuration can increase airflow and reduce congestion. Conversely, for smaller projects, lowering the stack facilitates easier access and monitoring of the herbs. This flexibility is particularly beneficial for users with limited space, as the drying rack can be tailored to individual needs.
Incorporating integrated storage containers into the stackable drying rack can also enhance organization. These containers can hold fresh herbs prior to drying, thus saving time and space. Having dedicated slots for fresh herbs prevents overcrowding, which can hinder airflow and lead to poor drying conditions. Additionally, these containers can serve as finished storage for dried herbs, ensuring that they maintain freshness while remaining easily accessible.
Lastly, to maximize airflow and minimize the risk of mold, users should consider adding ventilation holes in the side panels of the drying rack. This simple modification encourages effective air circulation, an essential component in properly drying herbs. By thoughtfully integrating these features, you can create a highly functional and efficient stackable herb drying rack that meets your specific needs.
Best Herbs to Dry and Techniques
When considering which herbs are best suited for drying, it is essential to focus on varieties that retain their flavor and aroma well after the drying process. Herbs such as basil, oregano, thyme, and rosemary make excellent candidates due to their robust flavor profiles and versatility in culinary applications. Other herbs like mint, dill, and tarragon also dry well and can enhance various dishes effectively.
To begin, it is important to harvest herbs at the right time. Ideally, herbs should be collected in the morning after the dew has evaporated but before the heat of the day sets in. This ensures that their essential oils are at peak potency, which significantly enhances the drying process. Avoid harvesting herbs after a heavy rain, as excess moisture can lead to mold during the drying phase.
Once the herbs have been harvested, they need to be prepared for drying. Rinse them gently under cold water to remove any dirt or insects, and allow them to dry completely on a clean towel. It is advisable to remove any damaged or wilted leaves, as they can negatively impact the quality of the final dried product.
Next, arranging the herbs on your stackable herb drying rack requires attention to detail. For optimal airflow, spread the herbs in a single layer, ensuring that they are not overcrowded. This will facilitate even drying and reduce the likelihood of mold development. Depending on the herb type, drying times may vary; leafy herbs generally dry within one to two weeks, while woody herbs may require longer.
In conclusion, understanding the best herbs to dry and employing proper harvesting and preparation techniques will enhance the quality of your dried products. Utilizing a stackable herb drying rack further supports an efficient and effective drying process, allowing you to enjoy the flavors of your garden long after the growing season has ended.
Maintenance and Care of Your Drying Rack
Proper maintenance and care of your stackable herb drying rack are essential for both longevity and hygiene. A well-maintained drying rack not only extends its service life but also ensures that your herbs remain free of contaminants. To begin with, it is important to choose the right cleaning materials. Avoid harsh chemicals that can leach into your herbs or leave harmful residues. Instead, opt for mild dish soap and warm water. A soft sponge or cloth typically suffices for cleaning, as abrasive materials can scratch the surface and compromise the integrity of the drying rack.
Cleaning your drying rack regularly is crucial, especially if you've been using it frequently. Ideally, you should give it a thorough clean after each use, particularly if it has come into contact with moisture or any herbal residue. This not only prevents any mold or bacterial growth but also keeps the herbs fresh when placed in the rack at a later time. If you store your drying rack in a humid environment, consider increasing the frequency of your cleanings to once a week. Keeping the rack dry and well-ventilated when not in use will also help in minimizing potential issues.
When it comes to storage, there are a few best practices to follow to ensure your herb drying rack stays in good condition. Always disassemble stacked components and store each piece separately. This prevents scratching and potential damage to the surface. If your drying rack is made of wood, ensure that it is kept in a dry, cool environment to prevent warping or mold. Storing it in a cloth bag can also keep dust and other contaminants at bay, furthering the longevity of your investment in this essential herb gardening tool.
Conclusion and Final Thoughts
In conclusion, building a stackable herb drying rack is an excellent DIY project for those who are passionate about gardening and cooking. This functional piece not only maximizes space but also enhances the process of drying herbs with efficiency. By creating a dedicated area for herb drying, you can preserve the freshness of your home-grown plants, ensuring that you have a steady supply of aromatic flavors for your culinary endeavors.
The benefits of utilizing a stackable herb drying rack are manifold. Firstly, it allows for better air circulation, which is crucial for effective drying, preventing mold and ensuring that your herbs retain their color and potency. Moreover, its stackable design means it can fit into various spaces, making it a versatile addition to your home, whether in the kitchen, patio, or a dedicated gardening area.
On an aesthetic level, a well-made drying rack serves as a decorative element, showcasing your herbs in a visually appealing manner. The process of drying your own herbs can also contribute to a more sustainable lifestyle, reducing the need for store-bought alternatives that may come with preservatives or packaging waste. Furthermore, the satisfaction derived from cultivating and drying your own herbs can enhance your connection to food and gardening, adding a personal touch to your culinary creations.
We encourage readers to embark on this rewarding DIY project. With some basic materials and tools, you can construct a functional and attractive herb drying rack tailored to your own needs. Embrace the joys of home cultivation and make your kitchen a more flavorful place through the simple act of drying your herbs at home.
Inspirations for a Sustainable living
Explore home and garden ideas, tutorials, and tips.
ConTACT
br1heusi@gmail.com
© 2025. All rights reserved.