Transform Your Broken Chair into a Rustic Plant Stand with Hidden Storage
DIY
8/8/20258 min read
Introduction to Upcycling
Upcycling is a creative process that involves taking unwanted items, particularly those that are broken or no longer serve their original purpose, and transforming them into new, functional objects. This practice not only reduces waste but also contributes positively to the environment by minimizing the amount of discarded furniture and other materials that end up in landfills. In recent years, upcycling has gained momentum as a sustainable choice for many homeowners who wish to repurpose outdated or damaged items into something both useful and aesthetically pleasing.
One of the significant advantages of upcycling furniture is its ability to encourage creativity. Individuals can explore their artistic side by using various techniques, materials, and designs to breathe new life into their broken pieces. This not only provides a platform for self-expression but also results in one-of-a-kind items that reflect personal style, thus enhancing the decor of any space. In the realm of upcycling, a broken chair can transform into a rustic plant stand with hidden storage, showcasing one's talent for craftsmanship while achieving functionality.
Furthermore, upcycling fosters a sense of satisfaction and accomplishment. The act of taking a discarded item and converting it into something beautiful and useful can be incredibly rewarding. Each upcycled piece tells a story, linking its past with the creative journey undertaken to restore its value. This makes furniture upcycling a particularly fulfilling endeavor, not just in terms of aesthetics, but in the environmental impact it generates. By choosing to upcycle rather than discard, we contribute to a more sustainable future and inspire others to follow suit, crafting an ecosystem that values sustainability alongside creativity.
Gathering Your Materials and Tools
To successfully transform a broken chair into a rustic plant stand with hidden storage, it is crucial to gather the right materials and tools. The focus of this project emphasizes utilizing items that not only enhance the aesthetic appeal of the final piece but also ensure durability and functionality. Begin by selecting a suitable broken chair; wooden chairs with a solid frame are ideal choices. Look for chairs that may have damaged legs or a broken seat, as these can be repurposed effectively. Thrift stores, garage sales, and online marketplaces can be excellent sources for finding such chairs at low prices.
Once you have selected your chair, gather essential materials such as wood glue, screws, and a wood stain or paint that aligns with your desired aesthetic. Wood glue is particularly important for reinforcing joints, while screws will provide added stability to your construction. Depending on your design preferences, you may also want to acquire decorative elements like stencils, paintbrushes, or small embellishments such as knobs or handles, which can provide a customized touch to your plant stand.
In terms of tools, basic woodworking tools such as a screwdriver, saw, and sandpaper will be necessary for this project. A paintbrush or roller will be helpful if you choose to paint or stain your piece. If you plan to add hidden storage compartments, ensure you have measuring tape for accuracy, allowing you to create space that is both functional and complementary to the overall design. While these tools can often be found at local craft shops or hardware stores, consider checking family and friends for borrowed supplies, reducing both cost and waste.
Preparing the Broken Chair for Upcycling
To transform a broken chair into a rustic plant stand with hidden storage, the first step is to properly prepare the chair for its new purpose. Begin by thoroughly cleaning the chair to remove any dust, dirt, or grime. A mixture of warm water and mild detergent can be effective. Use a soft cloth or sponge to wipe down all surfaces, ensuring that even hard-to-reach areas are addressed. After cleaning, allow the chair to dry completely before proceeding with assessment.
Next, assess the condition of the chair carefully. Look for any visible damage such as cracks, loose joints, or missing pieces. Take note of which parts of the chair are structurally sound and which ones may need reinforcement or removal. It may be beneficial to create a plan on whether to maintain the original backrest, seat, or legs, based on their condition and how they can contribute to the plant stand’s functionality.
If any parts of the chair need to be removed, such as a damaged seat or backrest, approach the dismantling process with caution. Use appropriate tools, such as a screwdriver or pry bar, to ensure that removal is done safely. When separating pieces, be mindful of how they are connected to prevent any additional damage. For components that remain, check for stability and reinforce weak joints using wood glue or screws if necessary.
For any structural issues that are found during the assessment, consider how to repair them adequately. This could involve tightening screws, replacing broken parts, or adding wooden dowels for extra support. Once structural integrity is ensured, the chair is now ready for the next stages of upcycling, facilitating a successful transformation into a rustic plant stand that not only looks appealing but is also structurally sound.
Designing Your Plant Stand: Function Meets Aesthetics
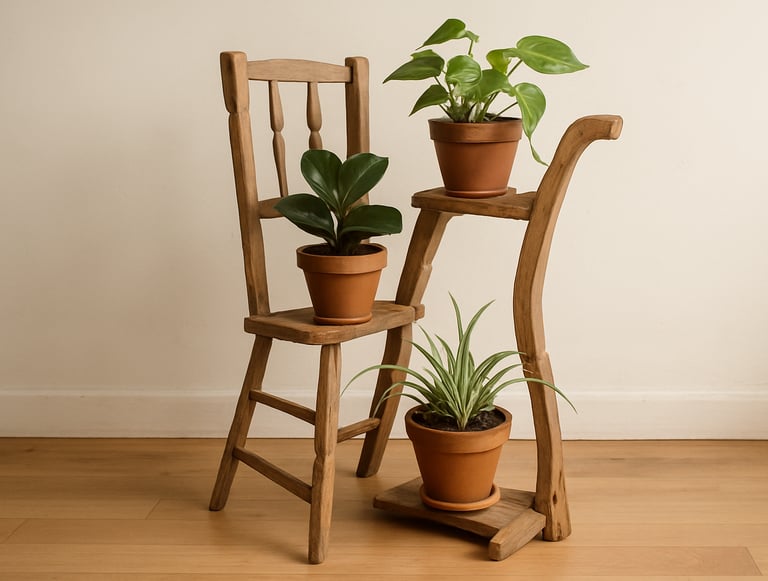
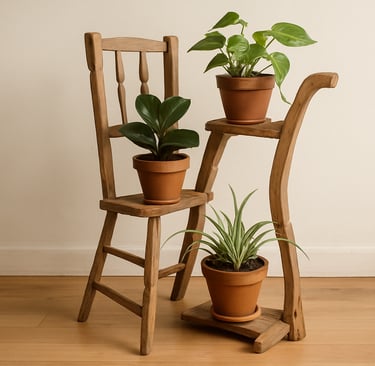
When designing a rustic plant stand derived from a broken chair, it is essential to strike a harmonious balance between functionality and aesthetics. The first consideration is height; the ideal plant stand allows for easy access to plants while showcasing their beauty at eye level. A height of approximately three feet is generally suitable for most indoor spaces, making it comfortable for watering and care. However, this can be adjusted based on the specific plants you plan to feature. Taller plants may benefit from a taller stand, while trailing vines can thrive on lower tiers.
The number of tiers is another crucial aspect of design. A multi-tiered plant stand maximizes space, allowing for various plant types and sizes to coexist harmoniously. Consider the growth habits of your selected plants; some may need horizontal space while others may thrive vertically. Ideally, design your stand to accommodate both, ensuring that each level receives adequate light and ventilation. This careful arrangement not only enhances the visual appeal of your collection but also promotes healthy plant growth.
Storage solutions are a significant factor, particularly when considering hidden storage within your plant stand. Integrating compartments or drawers can provide a practical space for potting tools, watering cans, and plant care supplies, keeping your area orderly and tidy. These storage options can be incorporated within the frame of the stand, utilizing the chair's existing structure creatively. For instance, you might repurpose a seat as a drawer or use the chair’s backrest to create a concealed shelf. This clever design touch not only beautifies your living space but also serves as an efficient way to manage your gardening essentials.
Ultimately, when designing your rustic plant stand, consider how the interplay of height, tier arrangement, and storage can elevate both the aesthetic and functional qualities of your greenery display, creating a unique piece that enhances your home while nurturing your plants.
Step-by-Step Construction Guide
Transforming a broken chair into a rustic plant stand with hidden storage is a rewarding project that not only repurposes furniture but also adds charm to your living space. Follow this detailed step-by-step guide to reconstruct your chair effectively.
Begin by disassembling the chair. Use a screwdriver to carefully remove screws from the seat and backrest while preserving the leg structure. This will allow you to utilize the legs and possibly the seat frame as a base for your new plant stand.
Next, measure and cut the remaining seat to fit snugly over the chair legs. If the seat is too thick for the new design, consider trimming it down using a saw. This step is essential to ensure that the plant stand is stable. Sand the edges to mitigate any splinters that may arise from cutting.
Once you have a suitable piece for the top, secure it to the legs with strong wood adhesive and reinforce with screws. Be sure to check for stability after securing the connections; a wobbly structure will not serve well as a plant stand.
To create hidden storage, you can remove any remaining parts, such as the backrest, and transform it into a small compartment. Use hinges to attach the lid, allowing easy access for storage. If you encounter challenges with aligning hinges or ensuring the lid closes properly, consider adjusting the height with small spacers or additional bracing under the lid.
For the final touches, give the entire piece a coat of stain or paint that complements your décor. This enhances not only the plant stand's aesthetic but also provides added protection to the wood. If you experience difficulties in painting or staining, ensure to apply thinner layers, allowing each coat to dry before applying the next.
Following these steps will guide you in creating a beautiful and functional rustic plant stand that showcases your creativity and resourcefulness while ensuring seamless hidden storage.
Finishing Touches: Paint, Stain, and Decor
To elevate the rustic appeal of your transformed chair into a plant stand, selecting the right paint or stain is paramount. Opting for natural tones such as browns, greens, or soft creams can enhance the organic feel of the project. Additionally, consider using a matte or satin finish to maintain a more subdued, rustic aesthetic rather than a high-gloss sheen. This choice allows the natural texture of the wood to remain visible, contributing to the overall charm of the plant stand.
When applying paint or stain, it is essential to prepare the surface thoroughly. Sand the wood lightly to remove imperfections and create a smooth base. Use a clean cloth to wipe away any dust. For staining, a brush or cloth can be used to apply the stain evenly, allowing for greater control over the depth of color. Remember to follow the manufacturer’s instructions on drying times to ensure a flawless finish. If opting for paint, consider using chalk paint for its matte finish and easy application.
To further personalize your rustic plant stand, consider incorporating decorative elements. Stencils can be applied to add intricate designs or personal messages that resonate with your style. Moreover, accents made from natural twine can be woven around the stand, providing a homespun touch that amplifies its rustic charm. Using reclaimed wood pieces as additional decorative elements can not only enhance the visual appeal but also ensure that your plant stand remains eco-friendly.
Ultimately, your goal should be to create a piece that reflects your individual style while complementing the decor of your home. Be playful with colors and designs, as this project is an opportunity to showcase your creativity and natural aesthetic.
Showcasing Your New Plant Stand: Care Tips and Ideas
Once your rustic plant stand has been crafted from a repurposed chair, it is essential to ensure its longevity and aesthetic appeal through proper care. Begin by regularly checking the structure for any signs of wear and tear, especially if the stand has been subjected to outdoor conditions. To maintain the wood's integrity, applying a protective sealant or wood polish will help to prevent moisture damage and preserve its rustic charm. If the plant stand has any metal components, ensure they are treated with rust-resistant paint to prevent deterioration over time.
When it comes to styling your newly created plant stand, consider incorporating a variety of indoor plants that not only beautify your space but also thrive in such environments. Popular choices include pothos, snake plants, and peace lilies, as they require minimal care and can flourish under indirect sunlight. Arranging plants of varying heights creates visual interest; place taller plants at the back or center of the stand, while cascading ones like philodendrons can be positioned at the edges for a layered effect.
Utilizing decorative pots or unique containers can further enhance the aesthetic appeal of your plant stand. Choose pots that complement the rustic look of the stand—terracotta, woven baskets, or ceramic pots in earthy tones work particularly well. To add a personal touch, arrange decorative stones or moss around the plants to create a polished, nature-inspired look.
Encouraging creativity, we invite readers to share their photos of completed projects, showcasing how they have styled their own plant stands. Additionally, feel free to share any innovative ideas you may have for upcycling furniture into functional decor. Your contributions can inspire others in their journey toward creating beautiful and sustainable interiors.
Inspirations for a Sustainable living
Explore home and garden ideas, tutorials, and tips.
ConTACT
br1heusi@gmail.com
© 2025. All rights reserved.